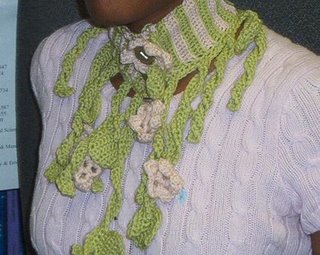
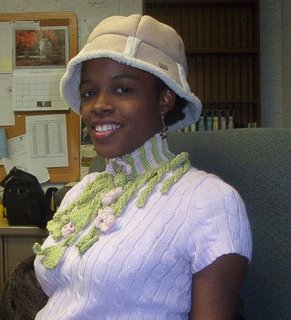
Friday, October 27, 2006

My Patterns

S'more Cables and Lace Sleeveless Turtleneck

I will update this post whenever I post a new pattern and it will be accessible from a link in the right-hand menu.

My first pattern for sale is now available. It is "S'more", my cables and lace sleeveless turtleneck, knit in Malabrigo. It's named for its marshmallowy softness and squishiness.

Specs:
Level: Intermediate
Finished bust size: 32.5" (35", 37.5", 40", 43.5", 47", 50.5")
Materials: 3 (3, 4, 4, 4, 5, 5) skeins of Malabrigo, Continental Blue; size 8 (5mm) needles straight and 16" circular; cable needle; stitch markers; waste yarn
Gauge: 19 sts, 28 rows = 4" on size 8 (5 mm) needles in st st

Make payments with PayPal - Download with PayLoadz


Make payments with PayPal - Download with PayLoadz

Thursday, October 26, 2006

I Am a Winner!

Mommy always said I was a winner, and she was right! I won, I won! I won for the Stylish category in the Model Your Socks Contest. Thank you, Keohinani, for hosting the contest! Yesterday I got this wonderful package in the mail.


I got two hanks of KnitPicks Gloss in Woodland Sage. It's a 70% merino 30% silk blend, and boy does it feel like it. Yum. Speaking of yum, I also got candy. Pez in a Hello Kitty dispenser. In fact, I got a lot of Hello Kitty stuff, as you can see from the picture. The dispenser is on a whole new level of cute, though. Witness: The body is purple. Hello Kitty is winky. She has sitting on top of her head a little bunny. Both her and the bunny have flowers on their heads. The bunny is wearing pink overalls. I'm telling you people, I nearly exploded. Maybe we can get a Hello Kitty pic up a little later.

Sunday, October 22, 2006

Cables and Lace Sleeveless Turtleneck

This is a pattern I came up with for my three hanks of Malabrigo in Continental Blue. I love this yarn. People say it's like knitting clouds, but I think it's a wee too squishy to be what I'd imagine a cloud to feel like. Maybe like clouds while you're knitting, but a bit more substantial when it's done. More like a mixture of cloud and marshmallow. And now you know why people call it Mmmmmmalabrigo.

Anyhow, someone said I should write this pattern up to sell. Well, okay, I will. We remember what happened when someone suggested I send in a pattern to Magknits, right? Sadness, people, sadness and disappointment, that's what happened. But I figure I will give it a go and see if people actually want to buy it. It may take me a couple of days to work out the math for larger sizes, though, cuz of course my notes are only for my size. But in a bit I'll put it up for sale to download.

I think I'll need a catchy name for it, though. Can anyone help me? Would it be an incentive if I said that if I choose your name you get a copy of the pattern for free? (wish i could pay, but you know how my wallet always is: empty)

Okay, here are the pics. Hopefully by the time this is up for sale, there will be prettier pics (where I don't look so busted) that will make you want to buy 17 copies. Why should you need 17 copies, I don't know, but that would make me really happy. ;-)


In other news, my blog is now officially rated PG-13:


The other side reads "I have needles and I'm not afraid to use them". Get your own at Cafe Press.

Finally, I won the Stylish category for the Model Your Socks contest. I'm thrilled about it, but think I will wait to blog about it until I receive my prize in the mail.

Wednesday, October 18, 2006

Flowers and Vines Crochet Neck Warmer

Yay, I finished something! Yay, crochet! This is a neckwarmer I made from one ball each of two colors of RYC Cashsoft. I used absolutely all of the green, but about 1/3 of the pink ball was left. A tutorial for how to make this is below the photos.


How to make it
You will need 2 50gram balls in your choice of color in your choice of a light worsted/dk weight yarn. I used RYC Cashsoft.
Color A: That green color
Color B: That pink color

I used a size F hook.
Gauge is not critical. But for me 15 sc = 2 1/2 inches on size F hook.

Neckwarmer band
With A, ch 16.
Row 1: skip first ch and sc in each ch across. (15 sc) ch 1, turn.
From this point on for the whole band, you will be working your single crochet in the back loops only.
Row 2: sc across in the back loops, dropping A and changing to B in the last st.

Repeat row 2, changing colors every two rows (do row 3-4 in B, 5-6 in A, 7-8 in B, and so on). Do not break the yarn for each change, just carry it loosely up the side.
Continue this until your piece measures approximately 11 1/2 inches. The next row will be the buttonhole row.

Buttonhole row: sc in first 3 sc, ch 2, sk next 2 sc, sc in next 4 sc , ch 2, sk next next 2 sc, sc in rem 4 sc. ch1, turn.
Next row: sc in back loop of each sc and each ch across.

Work row 2 once more. If this last row is green, continue with the vine portion below. If not, work one more row so that the last row is green and continue with the vine portion. You can break A (the pink color), but do not cut B.

Neckwarmer base
ch 1, now turn the work so that you can work along the ends of the rows. sc in the end of each row until the end. ch 1, turn.

Below I tell you how to make the parts of the neckwarmer, the vines, leaves, and flowers, so refer to those instructions as you go along. The general procedure for putting all the vines and flowers on the neckwarmer base is as follows:

After completing the row of the neckwarmer base, sc in first 2 sc, make a long or short vine and however many leaves or offshoot vines you want to off this main vine. Once the vine is completed and you have joined the yarn back to the neckwarmer base, sc in next 5 sc and make another vine of your choosing. Continue this across until you have fewer than 5 sc remaining on the neckwarmer base. sc in those last few stitches and fasten off. Sew flowers onto whichever part of the vines you desire. I did mine on top of the leaves.

Vines
Do not break the yarn at any point.

To make a long vine: ch 40.
Row 1: sc in second ch from hook and each ch across. ch 1 turn
Rows 2-3: sc in each sc across. ch 1, turn, except at end of row 3, join to next sc on neckwarmer base with a sl st.

To make a short vine: Do as for long vine except start with ch 30 instead of ch 40

To make an offshoot vine: On row 3 of your long or short vine, at whatever point in the row you choose, ch 15, sc in 2nd ch from hook and each ch back to beg ch, join to next stitch on main vine with a sc.

To make a leaf: On row 3 of vine, at whatever point in the row you choose:
ch 1, turn.
Row 1: sc in 3 sc (so this looks like you were going to start a 4th row on the main vine). ch 1, turn.
Row 2: 2 sc in 1st sc, sc in next sc, 2 sc in last sc (5 sc). ch 1, turn.
Row 3: 2 sc in 1st sc, sc in next 3 sc, 2 sc in last sc (7 sc). ch 1, turn.
Row 4: 2 sc in 1st sc, sc in next 5 sc, 2 sc in last sc (9 sc). ch 1, turn.
Row 5: sc across. ch 1, turn.
Row 6: work 2 sc tog, sc in next 5 sc, work last 2 sc tog (7 sc). ch 1, turn.
Row 7: sc acroos. ch 1, turn.
Row 8: work 2 sc tog, sc in next 3 sc, work last 2 sc tog (5 sc), ch 1, turn.
Row 9: work 2 sc tog, sc in next sc, work last 2 sc tog ( 3 sc), ch 1, turn.
Row 10: work 3 sc together. ch 1.

Now working along the side of the leaf that will get you back down to the main vine going in the direction back up towards the neckwarmer base, sl st along the edge of the leaf in each row. This is done just so you can get back to completing row 3 of the vine without having to cut the yarn. Once you are down to the bottom of the leaf, sc in next sc of row 3 of the main vine and continue to sc across until you are back up to the neckwarmer base, and you have just completed row 3.

To make a flower:
ch 5. join to 1st ch to form a loop.
Rnd 1: working in loop, *sc, ch 3* 5 times. join to first sc with sl st.
Rnd 2: work (sc, hdc, dc, trc, dc, hdc, sc) in each of the ch 3 spaces. join to first sc with sl st. fasten off.

Closure:
Okay, so at this point you should have a long strip with vines and flowers dangling from it. Now you need to sew two 3/4" diameter buttons to the side of the neckwarmer that does not have the buttonholes. Make sure they will approximately line up with the position of the buttonholes once you fold the neckwarmer into a circle.

Make a flower and a leaf as above, except for the flower, start with a ch 8 (so that the ring that is formed will be big enough for the button to go through) and for the leaf, start it by chaining 5 and working a sc in 2nd ch from hook, ch 2 and sk next two chains (this is buttonhole), and 2 sc in last ch. Ch 1, turn, sc in each sc and ch across (5 sc). Continue leaf construction as above, starting from row 3.

Now sew the flower and leaf onto the neckband so that the buttonholes on the neckwarmer are aligned with the buttonholes of the leaf and flower.

Now you should be able to fold the neckwarmer around your neck and button it by pushing the buttons through both the buttonholes on the neckwarmer itself and through the flower and leaf.

If you have any questions, please send an email or post a comment and I'll try to clarify. If you make it, please show me a pic as I'd love to see.

Saturday, October 07, 2006

Lantern Moon Basket "Indochine" for Birthday!

Okay, so my birthday was May 31st. It had to be special ordered from a lys in California, and my Daddy told them to send it directly to Chicago. But by then I had already left for South Africa. So it was returned to the factory. Then they shipped the basket to the lys, where my daddy picked it up and kept it during the summer. Finally, he shipped it to me, so after the 3rd shipping and 4 months later, I have it! You can see all the beautiful Lantern Moon bags at the following link, which is where I chose my favorite, Indochine
http://www.lanternmoon.com/AA.asp


Thursday, October 05, 2006

Tales from the Silly Side: Yo Ugly Mama

Why did you get angry with me when I called yo mama ugly? It's not my fault yo mama ugly. I, along with the rest of the world, feel sorry for yo ugly mama. And yet, you were angry with me. With me! As though I was the one who made her ugly. Why weren't you angry with your grandparents? They were the ones who produced such offspring. All I was trying to do was warn the general public, particularly those with weak hearts, that yo ugly mama was approaching, and that they might want to look to whatever precautions they deemed necessary: hiding, yelling and running in fear, gouging their eyes out, collectively putting a giant paper bag over her head, and one over their heads just in case hers came off, removing their glasses before they see her lest they spontaneously shatter into a thousand tiny pieces from the horror of it all. And really, I was thinking of yo ugly mama, too, because I saw that she was fast coming upon a full length mirror and I didn't want her to inadvertantly glance into the mirror, causing goddess-knows-what damage to her psyche. Truly, like the astronomical expanse of the the multiverse, human psyches are not prepared to contemplate the enormity of yo mama's ugliness. I was only doing what I thought was a kindness to yo ugly mama and all around her who have to endure her presence. Is it a crime to want to prevent further damage to our corneas in a world of rising vision care costs?

So next time someone points out yo mama's ugliness, don't get mad at them. Don't blame the messenger. Instead, let us work together for a future where, hopefully, there is never again born an individual who is quite as ugly as yo mama.

Sunday, October 01, 2006

Save the Socks at All Costs!

You'd never expect to hear that phrase twice in a day from separate people, and yet, I did. I was knitting these things like crazy. Knitting while walking to the bus stop, waiting for the bus, on the subway, transferring trains, crossing the street. So I could finish in time for the Model Your Socks Contest. Wish me luck. They're my first pair of socks! On size 3 needles using Lorna's Laces Shepherd Sport in colorway Black Purl. I was helped through Silver's Sock Tutorial . Thank's, Silver!


I like the one below better cuz it makes my legs look so sexy! But unfortunately, it doesn't show enough sock for a Model Your Socks contest.