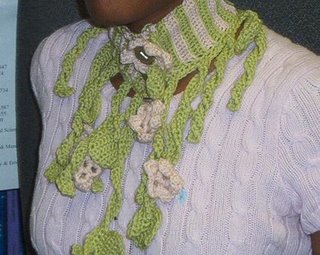
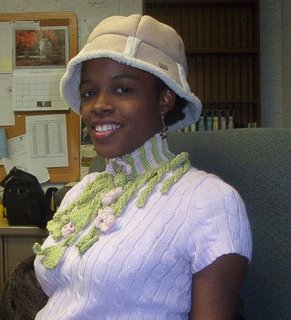
Yay, I finished something! Yay, crochet! This is a neckwarmer I made from one ball each of two colors of RYC Cashsoft. I used absolutely all of the green, but about 1/3 of the pink ball was left. A tutorial for how to make this is below the photos.


How to make it
You will need 2 50gram balls in your choice of color in your choice of a light worsted/dk weight yarn. I used RYC Cashsoft.
Color A: That green color
Color B: That pink color
I used a size F hook.
Gauge is not critical. But for me 15 sc = 2 1/2 inches on size F hook.
Neckwarmer band
With A, ch 16.
Row 1: skip first ch and sc in each ch across. (15 sc) ch 1, turn.
From this point on for the whole band, you will be working your single crochet in the back loops only.
Row 2: sc across in the back loops, dropping A and changing to B in the last st.
Repeat row 2, changing colors every two rows (do row 3-4 in B, 5-6 in A, 7-8 in B, and so on). Do not break the yarn for each change, just carry it loosely up the side.
Continue this until your piece measures approximately 11 1/2 inches. The next row will be the buttonhole row.
Buttonhole row: sc in first 3 sc, ch 2, sk next 2 sc, sc in next 4 sc , ch 2, sk next next 2 sc, sc in rem 4 sc. ch1, turn.
Next row: sc in back loop of each sc and each ch across.
Work row 2 once more. If this last row is green, continue with the vine portion below. If not, work one more row so that the last row is green and continue with the vine portion. You can break A (the pink color), but do not cut B.
Neckwarmer base
ch 1, now turn the work so that you can work along the ends of the rows. sc in the end of each row until the end. ch 1, turn.
Below I tell you how to make the parts of the neckwarmer, the vines, leaves, and flowers, so refer to those instructions as you go along. The general procedure for putting all the vines and flowers on the neckwarmer base is as follows:
After completing the row of the neckwarmer base, sc in first 2 sc, make a long or short vine and however many leaves or offshoot vines you want to off this main vine. Once the vine is completed and you have joined the yarn back to the neckwarmer base, sc in next 5 sc and make another vine of your choosing. Continue this across until you have fewer than 5 sc remaining on the neckwarmer base. sc in those last few stitches and fasten off. Sew flowers onto whichever part of the vines you desire. I did mine on top of the leaves.
Vines
Do not break the yarn at any point.
To make a long vine: ch 40.
Row 1: sc in second ch from hook and each ch across. ch 1 turn
Rows 2-3: sc in each sc across. ch 1, turn, except at end of row 3, join to next sc on neckwarmer base with a sl st.
To make a short vine: Do as for long vine except start with ch 30 instead of ch 40
To make an offshoot vine: On row 3 of your long or short vine, at whatever point in the row you choose, ch 15, sc in 2nd ch from hook and each ch back to beg ch, join to next stitch on main vine with a sc.
To make a leaf: On row 3 of vine, at whatever point in the row you choose:
ch 1, turn.
Row 1: sc in 3 sc (so this looks like you were going to start a 4th row on the main vine). ch 1, turn.
Row 2: 2 sc in 1st sc, sc in next sc, 2 sc in last sc (5 sc). ch 1, turn.
Row 3: 2 sc in 1st sc, sc in next 3 sc, 2 sc in last sc (7 sc). ch 1, turn.
Row 4: 2 sc in 1st sc, sc in next 5 sc, 2 sc in last sc (9 sc). ch 1, turn.
Row 5: sc across. ch 1, turn.
Row 6: work 2 sc tog, sc in next 5 sc, work last 2 sc tog (7 sc). ch 1, turn.
Row 7: sc acroos. ch 1, turn.
Row 8: work 2 sc tog, sc in next 3 sc, work last 2 sc tog (5 sc), ch 1, turn.
Row 9: work 2 sc tog, sc in next sc, work last 2 sc tog ( 3 sc), ch 1, turn.
Row 10: work 3 sc together. ch 1.
Now working along the side of the leaf that will get you back down to the main vine going in the direction back up towards the neckwarmer base, sl st along the edge of the leaf in each row. This is done just so you can get back to completing row 3 of the vine without having to cut the yarn. Once you are down to the bottom of the leaf, sc in next sc of row 3 of the main vine and continue to sc across until you are back up to the neckwarmer base, and you have just completed row 3.
To make a flower:
ch 5. join to 1st ch to form a loop.
Rnd 1: working in loop, *sc, ch 3* 5 times. join to first sc with sl st.
Rnd 2: work (sc, hdc, dc, trc, dc, hdc, sc) in each of the ch 3 spaces. join to first sc with sl st. fasten off.
Closure:
Okay, so at this point you should have a long strip with vines and flowers dangling from it. Now you need to sew two 3/4" diameter buttons to the side of the neckwarmer that does not have the buttonholes. Make sure they will approximately line up with the position of the buttonholes once you fold the neckwarmer into a circle.
Make a flower and a leaf as above, except for the flower, start with a ch 8 (so that the ring that is formed will be big enough for the button to go through) and for the leaf, start it by chaining 5 and working a sc in 2nd ch from hook, ch 2 and sk next two chains (this is buttonhole), and 2 sc in last ch. Ch 1, turn, sc in each sc and ch across (5 sc). Continue leaf construction as above, starting from row 3.
Now sew the flower and leaf onto the neckband so that the buttonholes on the neckwarmer are aligned with the buttonholes of the leaf and flower.
Now you should be able to fold the neckwarmer around your neck and button it by pushing the buttons through both the buttonholes on the neckwarmer itself and through the flower and leaf.
If you have any questions, please send an email or post a comment and I'll try to clarify. If you make it, please show me a pic as I'd love to see.

7 comments:
I love the scarf and I can't believe you cut your hair; you're so brave!
Neat neckwarmer! And is Enif your little bunner?? What sweet cute eyes!
=:8
Looks fantastic!! Woo hoo!!!
how very cute. :)
and you won a raffle to get a polaroid with male strippers?! wow. that's an interesting "prize." hehe.
Girl, you are talented!
I can't wait to make one - thanks so very much for sharing the pattern! And nice work on coming up with it. :)
Very cute!
Post a Comment