Tuesday, December 12, 2006

Toki

Okay, so I guess it's time to write about the passing of my little bunny, Toki. I got Toki about 2 years ago, and she died last Monday. She died so young. I should have rushed her to the hospital as soon as I saw her mushy poop, but I thought she could last a few hours as I was rushing off to work. So stupid. She was dead when I came back. I feel so guilty. I'm so sorry, Toki. Next time I will know better.


I cried a lot. I'm sure people will think it's silly, but she my was companion for two years. They live in my apt. with me, and my two bunnies were the last thing I would check on before I left the house and the first thing I would check on when I got back. I tried to take good care of her. Unlike Enif, who I adopted from a shelter, I got Toki from a pet store. She was so little, a baby Netherlands Dwarf. Here are some early pictures:


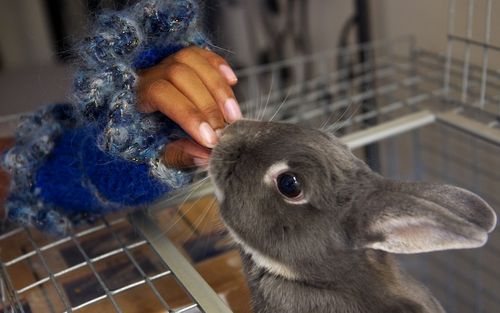
Here she is still getting to know Enif (the flash makes her eyes red):


Eating her veggies:

Somehow I had the idea that if she had been in a pet store being petted by lots of people, she'd be used to be touched and handled by people. But Toki was always a little shy of people, even me who she saw everyday, and Enif became more friendly. Go figure.


Her name means "rabbit" in Korean. Before I had her, I used to just call Enif "bunny", and I thought, "what will I do when i have another bunny?" So I named her 'rabbit' in Korean. Anyway, after I got her I stopped calling Enif "bunny" anyway. Some times I called her "Little Mama" because of her false pregnancy. When I first got her, she was too young to have spayed. Unspayed rabbits can sometimes go into a false pregnancy when mounted by a male. Enif had been neutered for a long time, but I guess it didn't matter because when she was around 4 or 5 months old, she had a false pregnancy. She went around the house gathering anything soft she could find to make a nest. Very destructive. She also took fur from her belly, and she turned their litter box into a nest. I think Enif was confused. See what she did to this doll's head!


So I got her spayed. Near $200! I cleaned her wound everyday, twice a day, though she hated it.

When I went to study Zulu in Bloomington, Indiana over the summer, I packed up my favorite plants, clothes, and my two bunnies and drove down there with them. Here is a picture of her all grown up from that time:


It was in Indianapolis that I found their bunny sitter, a volunteer for the House Rabbit Society. Even though I went back to Chicago after that summer, I still drove them down to their house when I went out of town because she is such a caring bunny lover. I will take Enif there next week while I visit family for xmas in CA. She said she would light a candle for Toki to help her cross the Rainbow Bridge. I'm not one for supernatural or spiritual stuff, but it is nice to imagine Toki as still being somewhere, curiously getting ready to cross a bridge where she will have other bunnies to snuggle with and get all the banana treats she wants.

I had her for two years. She was really special. Oh Little Mama, we will miss you around here. Goodbye, Toki.


Wednesday, December 06, 2006

Crazy for Colorwork

Since the fair isle sweater, I seem to have just gone crazy for colorwork. I just got Vol 3 of Vogue Knitting Stitchionary, and I love it. It's just what I wanted. I wish there were several more books like it so I could have a collection of thousands of colorwork patterns. But in the meantime I am using it to make some fair isle gloves. I'm knitting them flat because I didn't want to figure out how to do the thumb gusset while working fair isle. I'll sew up the side and leave a space for the thumb and then add the thumb and fingers on after, I think/hope. This is where I am so far. Just started last night. I LOVE the yarn I used for this. Frog Tree Alpaca's Merino. Alpaca makes me a little itchy, though not on my hands I guess. I used it for the headbands below, and I bought some more as comfort yarn right after dropping my dead bunny at the vet (post coming soon).


These are a couple of head bands I did for my upcoming ski trip. One for me and one for my companion, I guess. I got the snowflake motif from this site . I LOVE the yarn I used for this.


And this slip stitch pattern. I love slip stitch colorwork. So easy because you only do one color per row. I got the pattern here. But we aware that there is a typo on rounds 8 and 9, and the asterisk should be after the first slipped stitch. Also, worsted weight on size 10.5s is very loose. I used size 8s and cast on 90 stitches. Karabella Aurora 8 is the gray and Dolce Mohair Rigato is the self-striping mohair/acrylic blend.

Saturday, November 18, 2006

Drops pattern Fair Isle Sweater

So this is my first fair isle project. I wanted to be really happy with this sweater. I wanted to LOVE this sweater. I wanted to love it so much, little kids would say "if you love it so much, why don't you marry it?" And then I would say "I will." And then we would get married and spend many wonderful years together and have 1/2 black 1/2 sweater babies, until one day I had a baby that was 1/2 black 1/2 blue Malabrigo, and Mr. Karabella Aurora 8 Fair Isle would scream "whose baby is this?!" and storm out of the delivery room.

But I don't love it as much as all that. I guess it's okay for my first time. But it puckers in places and my increases look sloppy. I still don't know what to do to make my increases less visible, but I did get advice on the puckering. Someone told me every color change or two to give the work a tug so that the carried yarn in back gets pulled out and stretched all the way across flat. I think for something like this, too, I will knit the fair isle part on larger needles.

This was knit in Karabella Aurora 8 on size 7 needles.

Closeup of Yoke


From the front - another headless knitting photo


From the back

Friday, October 27, 2006

My Patterns

S'more Cables and Lace Sleeveless Turtleneck

I will update this post whenever I post a new pattern and it will be accessible from a link in the right-hand menu.

My first pattern for sale is now available. It is "S'more", my cables and lace sleeveless turtleneck, knit in Malabrigo. It's named for its marshmallowy softness and squishiness.

Specs:
Level: Intermediate
Finished bust size: 32.5" (35", 37.5", 40", 43.5", 47", 50.5")
Materials: 3 (3, 4, 4, 4, 5, 5) skeins of Malabrigo, Continental Blue; size 8 (5mm) needles straight and 16" circular; cable needle; stitch markers; waste yarn
Gauge: 19 sts, 28 rows = 4" on size 8 (5 mm) needles in st st

Make payments with PayPal - Download with PayLoadz


Make payments with PayPal - Download with PayLoadz

Thursday, October 26, 2006

I Am a Winner!

Mommy always said I was a winner, and she was right! I won, I won! I won for the Stylish category in the Model Your Socks Contest. Thank you, Keohinani, for hosting the contest! Yesterday I got this wonderful package in the mail.


I got two hanks of KnitPicks Gloss in Woodland Sage. It's a 70% merino 30% silk blend, and boy does it feel like it. Yum. Speaking of yum, I also got candy. Pez in a Hello Kitty dispenser. In fact, I got a lot of Hello Kitty stuff, as you can see from the picture. The dispenser is on a whole new level of cute, though. Witness: The body is purple. Hello Kitty is winky. She has sitting on top of her head a little bunny. Both her and the bunny have flowers on their heads. The bunny is wearing pink overalls. I'm telling you people, I nearly exploded. Maybe we can get a Hello Kitty pic up a little later.

Sunday, October 22, 2006

Cables and Lace Sleeveless Turtleneck

This is a pattern I came up with for my three hanks of Malabrigo in Continental Blue. I love this yarn. People say it's like knitting clouds, but I think it's a wee too squishy to be what I'd imagine a cloud to feel like. Maybe like clouds while you're knitting, but a bit more substantial when it's done. More like a mixture of cloud and marshmallow. And now you know why people call it Mmmmmmalabrigo.

Anyhow, someone said I should write this pattern up to sell. Well, okay, I will. We remember what happened when someone suggested I send in a pattern to Magknits, right? Sadness, people, sadness and disappointment, that's what happened. But I figure I will give it a go and see if people actually want to buy it. It may take me a couple of days to work out the math for larger sizes, though, cuz of course my notes are only for my size. But in a bit I'll put it up for sale to download.

I think I'll need a catchy name for it, though. Can anyone help me? Would it be an incentive if I said that if I choose your name you get a copy of the pattern for free? (wish i could pay, but you know how my wallet always is: empty)

Okay, here are the pics. Hopefully by the time this is up for sale, there will be prettier pics (where I don't look so busted) that will make you want to buy 17 copies. Why should you need 17 copies, I don't know, but that would make me really happy. ;-)


In other news, my blog is now officially rated PG-13:


The other side reads "I have needles and I'm not afraid to use them". Get your own at Cafe Press.

Finally, I won the Stylish category for the Model Your Socks contest. I'm thrilled about it, but think I will wait to blog about it until I receive my prize in the mail.

Wednesday, October 18, 2006

Flowers and Vines Crochet Neck Warmer

Yay, I finished something! Yay, crochet! This is a neckwarmer I made from one ball each of two colors of RYC Cashsoft. I used absolutely all of the green, but about 1/3 of the pink ball was left. A tutorial for how to make this is below the photos.


How to make it
You will need 2 50gram balls in your choice of color in your choice of a light worsted/dk weight yarn. I used RYC Cashsoft.
Color A: That green color
Color B: That pink color

I used a size F hook.
Gauge is not critical. But for me 15 sc = 2 1/2 inches on size F hook.

Neckwarmer band
With A, ch 16.
Row 1: skip first ch and sc in each ch across. (15 sc) ch 1, turn.
From this point on for the whole band, you will be working your single crochet in the back loops only.
Row 2: sc across in the back loops, dropping A and changing to B in the last st.

Repeat row 2, changing colors every two rows (do row 3-4 in B, 5-6 in A, 7-8 in B, and so on). Do not break the yarn for each change, just carry it loosely up the side.
Continue this until your piece measures approximately 11 1/2 inches. The next row will be the buttonhole row.

Buttonhole row: sc in first 3 sc, ch 2, sk next 2 sc, sc in next 4 sc , ch 2, sk next next 2 sc, sc in rem 4 sc. ch1, turn.
Next row: sc in back loop of each sc and each ch across.

Work row 2 once more. If this last row is green, continue with the vine portion below. If not, work one more row so that the last row is green and continue with the vine portion. You can break A (the pink color), but do not cut B.

Neckwarmer base
ch 1, now turn the work so that you can work along the ends of the rows. sc in the end of each row until the end. ch 1, turn.

Below I tell you how to make the parts of the neckwarmer, the vines, leaves, and flowers, so refer to those instructions as you go along. The general procedure for putting all the vines and flowers on the neckwarmer base is as follows:

After completing the row of the neckwarmer base, sc in first 2 sc, make a long or short vine and however many leaves or offshoot vines you want to off this main vine. Once the vine is completed and you have joined the yarn back to the neckwarmer base, sc in next 5 sc and make another vine of your choosing. Continue this across until you have fewer than 5 sc remaining on the neckwarmer base. sc in those last few stitches and fasten off. Sew flowers onto whichever part of the vines you desire. I did mine on top of the leaves.

Vines
Do not break the yarn at any point.

To make a long vine: ch 40.
Row 1: sc in second ch from hook and each ch across. ch 1 turn
Rows 2-3: sc in each sc across. ch 1, turn, except at end of row 3, join to next sc on neckwarmer base with a sl st.

To make a short vine: Do as for long vine except start with ch 30 instead of ch 40

To make an offshoot vine: On row 3 of your long or short vine, at whatever point in the row you choose, ch 15, sc in 2nd ch from hook and each ch back to beg ch, join to next stitch on main vine with a sc.

To make a leaf: On row 3 of vine, at whatever point in the row you choose:
ch 1, turn.
Row 1: sc in 3 sc (so this looks like you were going to start a 4th row on the main vine). ch 1, turn.
Row 2: 2 sc in 1st sc, sc in next sc, 2 sc in last sc (5 sc). ch 1, turn.
Row 3: 2 sc in 1st sc, sc in next 3 sc, 2 sc in last sc (7 sc). ch 1, turn.
Row 4: 2 sc in 1st sc, sc in next 5 sc, 2 sc in last sc (9 sc). ch 1, turn.
Row 5: sc across. ch 1, turn.
Row 6: work 2 sc tog, sc in next 5 sc, work last 2 sc tog (7 sc). ch 1, turn.
Row 7: sc acroos. ch 1, turn.
Row 8: work 2 sc tog, sc in next 3 sc, work last 2 sc tog (5 sc), ch 1, turn.
Row 9: work 2 sc tog, sc in next sc, work last 2 sc tog ( 3 sc), ch 1, turn.
Row 10: work 3 sc together. ch 1.

Now working along the side of the leaf that will get you back down to the main vine going in the direction back up towards the neckwarmer base, sl st along the edge of the leaf in each row. This is done just so you can get back to completing row 3 of the vine without having to cut the yarn. Once you are down to the bottom of the leaf, sc in next sc of row 3 of the main vine and continue to sc across until you are back up to the neckwarmer base, and you have just completed row 3.

To make a flower:
ch 5. join to 1st ch to form a loop.
Rnd 1: working in loop, *sc, ch 3* 5 times. join to first sc with sl st.
Rnd 2: work (sc, hdc, dc, trc, dc, hdc, sc) in each of the ch 3 spaces. join to first sc with sl st. fasten off.

Closure:
Okay, so at this point you should have a long strip with vines and flowers dangling from it. Now you need to sew two 3/4" diameter buttons to the side of the neckwarmer that does not have the buttonholes. Make sure they will approximately line up with the position of the buttonholes once you fold the neckwarmer into a circle.

Make a flower and a leaf as above, except for the flower, start with a ch 8 (so that the ring that is formed will be big enough for the button to go through) and for the leaf, start it by chaining 5 and working a sc in 2nd ch from hook, ch 2 and sk next two chains (this is buttonhole), and 2 sc in last ch. Ch 1, turn, sc in each sc and ch across (5 sc). Continue leaf construction as above, starting from row 3.

Now sew the flower and leaf onto the neckband so that the buttonholes on the neckwarmer are aligned with the buttonholes of the leaf and flower.

Now you should be able to fold the neckwarmer around your neck and button it by pushing the buttons through both the buttonholes on the neckwarmer itself and through the flower and leaf.

If you have any questions, please send an email or post a comment and I'll try to clarify. If you make it, please show me a pic as I'd love to see.

Saturday, October 07, 2006

Lantern Moon Basket "Indochine" for Birthday!

Okay, so my birthday was May 31st. It had to be special ordered from a lys in California, and my Daddy told them to send it directly to Chicago. But by then I had already left for South Africa. So it was returned to the factory. Then they shipped the basket to the lys, where my daddy picked it up and kept it during the summer. Finally, he shipped it to me, so after the 3rd shipping and 4 months later, I have it! You can see all the beautiful Lantern Moon bags at the following link, which is where I chose my favorite, Indochine
http://www.lanternmoon.com/AA.asp


Thursday, October 05, 2006

Tales from the Silly Side: Yo Ugly Mama

Why did you get angry with me when I called yo mama ugly? It's not my fault yo mama ugly. I, along with the rest of the world, feel sorry for yo ugly mama. And yet, you were angry with me. With me! As though I was the one who made her ugly. Why weren't you angry with your grandparents? They were the ones who produced such offspring. All I was trying to do was warn the general public, particularly those with weak hearts, that yo ugly mama was approaching, and that they might want to look to whatever precautions they deemed necessary: hiding, yelling and running in fear, gouging their eyes out, collectively putting a giant paper bag over her head, and one over their heads just in case hers came off, removing their glasses before they see her lest they spontaneously shatter into a thousand tiny pieces from the horror of it all. And really, I was thinking of yo ugly mama, too, because I saw that she was fast coming upon a full length mirror and I didn't want her to inadvertantly glance into the mirror, causing goddess-knows-what damage to her psyche. Truly, like the astronomical expanse of the the multiverse, human psyches are not prepared to contemplate the enormity of yo mama's ugliness. I was only doing what I thought was a kindness to yo ugly mama and all around her who have to endure her presence. Is it a crime to want to prevent further damage to our corneas in a world of rising vision care costs?

So next time someone points out yo mama's ugliness, don't get mad at them. Don't blame the messenger. Instead, let us work together for a future where, hopefully, there is never again born an individual who is quite as ugly as yo mama.

Sunday, October 01, 2006

Save the Socks at All Costs!

You'd never expect to hear that phrase twice in a day from separate people, and yet, I did. I was knitting these things like crazy. Knitting while walking to the bus stop, waiting for the bus, on the subway, transferring trains, crossing the street. So I could finish in time for the Model Your Socks Contest. Wish me luck. They're my first pair of socks! On size 3 needles using Lorna's Laces Shepherd Sport in colorway Black Purl. I was helped through Silver's Sock Tutorial . Thank's, Silver!


I like the one below better cuz it makes my legs look so sexy! But unfortunately, it doesn't show enough sock for a Model Your Socks contest.

Wednesday, September 27, 2006

I Cut Off My Hair!


Aaahhhhh! I cut my hair off! Again! Every couple of years, I feel like I just can't comb through so much nappiness even one more time, and I take out the scissors and just start cutting stuff off. Look at my fallen hair!


And since I don't actually know how to cut hair, I was looking all busted. Or so I thought. So I wore a hat for a few days and today decided I'd better try to do something with it, so I braided the front and gathered the rest in a poofball in the back. Then I wore my favorite high heel sandals and also a new red cotton dress to compensate for my bustedness. This is how I look.


Btw, you can also see where I have to work all the time now, in "the dungeon" as we call it. No natural light. We just moved our office and so everything is in boxes. It looks like a storage facility. Thank goodness I only work 12 hrs a week!

For comparison, my hair used to be this long, if I ever blew it out or flat ironed it. I look a little shocked because I had just drunk bee wine in this pic. Yep, bee wine. Scores of bee corpses floating in the bottom of the bottle. I think I actually swallowed a wing.


So anyway, I was walking home, trying my best not to look busted, when some dude asks if he can introduce himself to me from the car. Considering my to'-up state, I was a bit shocked and decided I could do with the flattery, so I let him spit his little game. Aw, fellas, c'mon fellas. I'm going to have to run a class. "How Not To Flirt 101". But okay, so I'm beautiful and if we weren't in the street and he wasn't so shy he'd just stare at me in my red dress, looking beautiful in my red dress. And several things popped into my mind. One was Crazy Sotho Guy, about whom I will have to write a post some day (but you don't understand how I feel, Nikki!). Another was some other dude who gave me one of my all-time favorite lines: I wish I had all the time in the world to look at you. Come to think of it, he was Sotho, too! And the next thing I thought about was Smoove . If you don't know, it's time you know. It is time you got Smooved. And so I'm like, "do you read The Onion". You know what? I think I will call him, if only to get his email address and forward him an article from Smoove.

Friday, September 22, 2006

Pretty Princess Fingerless Mittens

I'm posting pics and the pattern now so you all are welcome to it. Update: This pattern will be in Knitting Pattern a Day Calendar 2008. It's April 21st, Earth Day!


Isn't my bunny Enif cute?

Description: Fingerless mittens with the body knitted in ribbing to stretch to fit the average woman's hand, with big crocheted ruffle trim on top and bottom, and matching crocheted bows at wrist level. No ruffle on thumb or underside of glove to allow fingers to still move freely. For maximum girliness, try it all in pink.

Design: by Nikki Adams

Difficulty level: Intermediate

Materials:
Yarn A: 1 ball Cascade Pastaza (100 grams, 50% wool 50% llama)
Yarn B: 1 ball of Lion Brand Moonlight Mohair in coordinating color (50 grams, mohair blend)
Size 7 / 4.5 mm double pointed needles
Size H / 5 mm crochet hook
stitch markers

Substitutions: Cascade Pastaza is very warm, but slightly itchy. You might try Malabrigo, RYC Cashsoft Aran, or DB Cashmerino Aran . I knit a bit tightly, so other knitters may go with these slightly less bulky yarns to get gauge anyhow.
Substitutes for the Lion Brand mohair could be Trendsetter Dune or Valley Yarns Wildwood.

Size: To fit the average woman's hand.

Gauge: approximately 6 sts=1" / 2.5cm, 24 sts = 4" / 10cm in 4x1 rib with A on size 7 needles (approx. 5 sts/inch in st st), 25 rows = 4" / 10cm in rib, or any yarn/needle combo to give gauge. Gauge is not super crucial as ribbing will stretch.

Notes: You could make the ruffles slightly smaller by using a G (4.25) hook instead. For a slightly different look, weave a ¼ " ribbon around the wrist instead of the crocheted bow.
When number of stitches increase (as while working gusset) or decreases (once gusset stitches are put onto waste yarn), continue working the rib pattern as the stitches lie. That is, do not incorporate the new or lost stitches into the rib pattern; work these in st st.

Glove Body:

Cast on 35 sts with A. Divide over 3 dpns.
Work 4x1 rib (k 4, p 1) around until glove body reaches approximately 4 ½ ".

Begin Thumb Gusset:
Rnd 1: k1, pm, k1, M1, M1, pm. 5 sts between markers. Continue around in 4x1 rib (see notes).
Rnd 2: continue around in 4x1 rib pattern, slipping markers.
Rnd 3: slip marker, k1, M1 a total of three times evenly across sts between markers until you reach last st, k1, slip marker, continue around in 4x1 rib pattern.

Repeat rounds 2 and 3 until you have 14 sts between markers. Repeat Rnd 2 up to the point where you reach the 2nd marker. Slip stitches between markers onto waste yarn. Continue working around in 4x1 rib (see notes) for another 1 ½ ". BO loosely in rib pattern.

Thumb:
Slip sts from waste yarn onto 3 dpns.
For a small thumb:
Pick up 2 sts around the gap between gusset and glove body for a total of 16 stitches. Work in (k3, p1) rib for 3 rounds. BO loosely in rib.
For a medium - large thumb:
Pick up 4 sts around the gap between gusset and glove body for a total of 18 stitches. Work in (k2, p1) rib for 3 rounds. BO loosely in rib.

Crochet Trimmings:
Bottom ruffle: With hook and yarn B, sl st the yarn to join at any point on bottom end of glove body.
Rnd 1: Ch 1, sc in same space, and sc 24sts evenly around this bottom edge (or about 2 crochet stitches for every 3 knit stitches). (25 sts)
Rnd 2: sc in 1st st, *2 sc in next st, sc in next st* around. (49 sts)
Rnd 3: 2 sc in each st around (98 sts)
Rnd 4: repeat round 3 (196 sts). Fasten off.

Thumb edging:
Join B wth sl st, ch1, sc in same space, sc 12 sts around evenly (13 sc). Sl st in ch 1, fasten off.

Top ruffle:
Join B with sl st to align with thumb placement. Ch 1, sc in same sp, sc 24 around evenly. (25 sc) .
For right hand glove:
Turn. Working back and forth in rows now.
Row 1: ch 1, sc in 1st sc *2 sc in next sc, sc in next sc*, repeat from * to * 6 times more. (25 sc on this row). Turn.
Row 2: ch 1, 2 sc in each sc across (50 sc). Turn.
Row 3: ch 1, 1 sc in first sc, 2 sc in each sc across to last sc, 1 sc in last sc. (98 sc) Fasten off.

For left hand glove:
Do not turn, though you will be working back and forth in rows now. Do as for right hand glove from Rows 1-3, omitting the first ch 1 in row 1.

Bows:
Ch 15.
Join ch on top of glove at side opposite that of thumb, around wrist height (approx 2 ¼ " above body bottom).
Sl st loosely across knitting every 2-3 knitted colums (if it helps you do it more loosely, use a bigger hook) all the way around the glove until you reach the point where you first joined the ch.
Ch 15.
Fasten off. Cut off loose ends. Tie the chains into bows.
Weave in all ends and you're done! Try them in pink for the ultimate in girly princess-hood.

Tuesday, September 19, 2006

Blue Sky Alpacas Cotton Vest

So I started this a looong time ago (back in May, maybe?), but my seaming was so terrible, the result was ugly and I couldn't wear it. So it went into the stash box. I pulled it out yesterday (since I was home anyhow having stabbed myself quite deeply in the ankle with some scissors. ouch) and ripped out the seams, re-seamed it, and added some ribbing to the neckline and armholes. Now it's wearable, and just in time for fall!

I used 3 hanks of Blue Sky Alpacas Cotton (it's soo soft, the nicest 100% cotton I've worked with) in the Tomato color on size 9 needles.

Friday, September 08, 2006

After knitting a couple of garments, it was time to design my own. I'm currently submitting or thinking about submitting these patterns, so I can't really show them to you. But I can tease you! Both incorporate crochet as well. If they aren't accepted anywhere, I'll show you the whole photo and perhaps post the pattern.

Teasers


My second knitted wearable was this Evening Star Top from summer '06 issue of Interweave Knits magazine. I used Lorna's Laces DK Swirl in the Chino color.

Evening Star Top

Then I started knitting, some time this past February or so. I made one dishcloth, and it was nice, but it was not the reason I started knitting. I started knitting to make clothes. So this was my first item of clothing. It's made with Blue Heron's Rayon Metallic yarn. This yarn is heaven to work with. It's soft and beautiful. But to be honest, after several wearings, the top is a bit floppy. Now I know what knitters mean when they say a yarn doesn't have enough "body".

This is not my design, it's a slight modification of the free pattern you can find here:
http://www.yarnmarket.com/yarn/Artyarns_Free-Lacy_Silk_Tank_Top_Free-1981.html

My mouth is all twisted up because I'm chewing a potato chip. Oops.

Lacy Tank Top

This is a hat I crocheted in Paton's Classic Merino. Despite the gazillion hat patterns there are out there, none of them fit my big natural afro hair. That's why I had to make one. This is also my design. This hat is even cuter than it looks here. People are always stopping me to tell me my hat is so cute. Will have to take a better picture.

Paton's Merino Crocheted Hat

Gold Crochet Summer Top

Okay, so here's another top I crocheted. This one is also my design. It was done in Elann's Endless Summer Luna. This yarn is sooo pretty.


Gold Summer Top


Ripple Sweater


Okay, my first post in the knitting/crocheting blog world. Just going to put some of my pics up. The first is this ripple pattern sweater I crocheted. The design is my own. The white yarn is Lion Brand Yarn's MicroSpun. The turqoise and ginger yarn is Berroco Softwist. The glittery yarn is Trendsetter Dune in "Copper Patina".


Here is a closeup: